
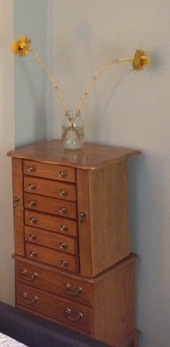
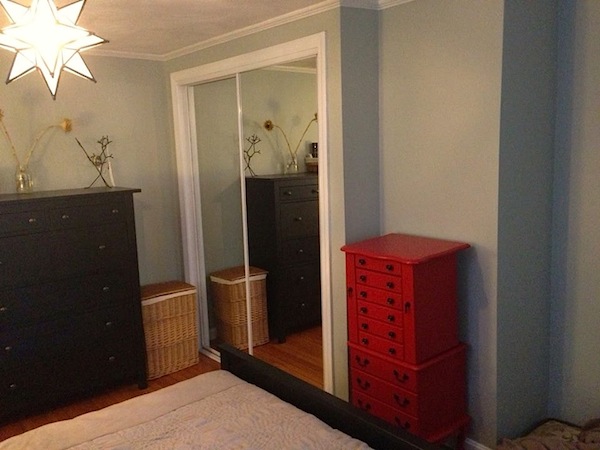
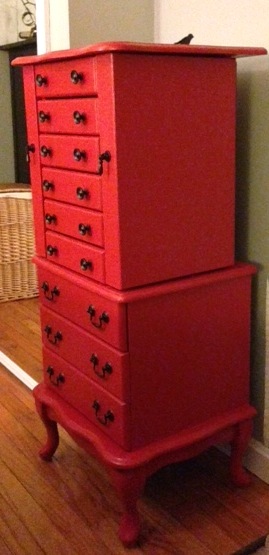
I have a fantastic jewelry chest/hutch that came to me as a hand-me-down from my family. I love its many compartments and slots for various bits and bobs, but it was suffering from a case of ’90s oak and gold finishes. I knew that we couldn’t redo our master bedroom without addressing this, ahem, little eyesore.
Now I am CERTAIN there’s a more correct way to do this, but, this method cost less than $20, was easy, and I did it by myself in a day. I’ve never painted a piece of furniture before, so don’t be daunted–you can do it!
Total cost: $19.47
Supplies:
- Paint:
- I used “Firecracker” by Behr
- I only needed part of a quart for this whole project.
- Disclaimer: I’m sure there’s official furniture paint out there somewhere, but, I just wanted to run into Home Depot and get ‘er done, so I opted for regular ol’ paint on the rationale that this is not a high-touch piece of furniture and isn’t used all that often unlike say, kitchen cabinets.
- Paintbrushes
- Sandpaper
- Damp rags
- Frugal tip: cut old t-shirts into rags
- Drop cloths
-
- Frugal tip: use leftover grocery sacks and paper bags instead of buying drop cloths.
- Spray paint:
- I spray painted my gold hardware with Rust-Oleum’s “Painter’s Touch 2X Ultra Cover Paint + Primer in Satin Dark Walnut” (that’s got to be the longest product name ever).
- Screwdriver
- Personal paint cup:
- Frugal tip: use an old plastic food container.
How to Refinish a Piece of Wood Furniture (the cheap, fast, and frugal way 🙂 )
Step 1: Prep your workspace.
- Frugal Husband helped me haul my hutch outside and I set it up on a drop cloth, but you could do this project inside if you wanted to.
- I always use a drop cloth or old newspapers/bags because, well, I’m a messy painter. It frees you from worrying about drips of paint and enables you to thoroughly paint the feet of your piece.
Step 2: Remove any drawers, hardware, and moving parts.
- You don’t want to paint around hardware (trust me, I’ve tried) and you definitely don’t want to paint drawers in their slots–don’t even ask…just learn from my mistakes.
Step 3: Sand every surface you plan to paint.
- It’s important to carefully sand away the existing finish or paint so that your new paint will adhere well.
- I sanded by hand because we don’t own a hand sander, but it’d probably be a lot faster if you do have one of those babies.
- Frugal tip: don’t rush out to buy a new tool or gadget for every DIY project. I often find I can re-use, re-purpose or improvise.
Step 4: Wipe it down.
- Use a damp rag to remove all dust and dirt kicked up by your sanding efforts.
- You don’t want to paint this stuff into your final product and paint doesn’t adhere to dirty surfaces.
Step 5: Prep your paint.
- Pour a small amount of paint into a personal paint cup/old plastic container.
- Don’t dip your brush into the gallon of paint because it might contaminate the whole supply.
- With a personal paint cup, if you get debris on your paint brush, you’ll only ruin a small amount of paint.
- Use a hammer and nail to punch small holes into the rim of your paint can–this allows excess paint to drip back into the bucket. Cover your can and hammer down the lid.
- Frugal tip: paint is the most expensive part of this project, but by following the above paint conservation techniques, you’ll use less paint! Don’t open a second can until you absolutely need it–you can return paint for a full refund if you don’t use it (I’ve returned many a can of unopened paint).
Step 6: Commence painting!

- I used paintbrushes we had leftover from painting the walls of our bedroom.
- I did four coats to get the smooth finish I wanted. I’m a huge proponent of multiple thin coats–globing on too much paint in a coat doesn’t give you smooth coverage and can bubble up.
- Frugal tip: I’m sure you can find fancy furniture paint brushes, but, my cheap brushes worked just fine.
Step 7: Spray paint your hardware (that’s the handles, knobs, etc).
- I spread my knobs out on paper bags and sprayed them all at once with sweeping sprays.
- Shake the can well and try to move it continuously as you spray so the paint doesn’t drip or clump up.
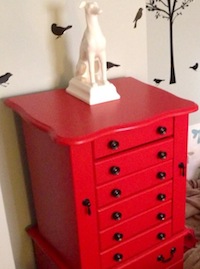
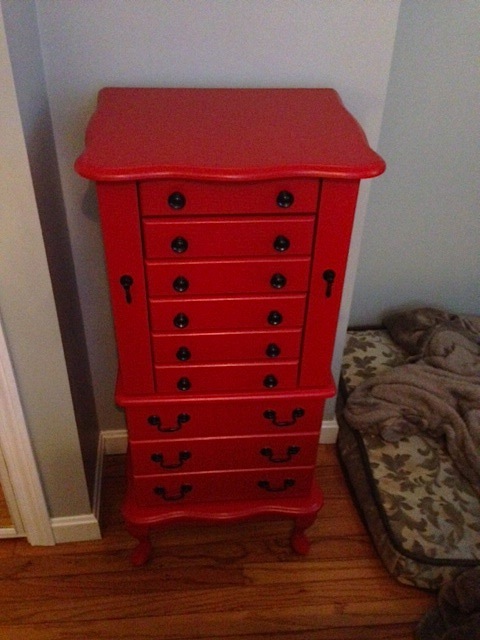
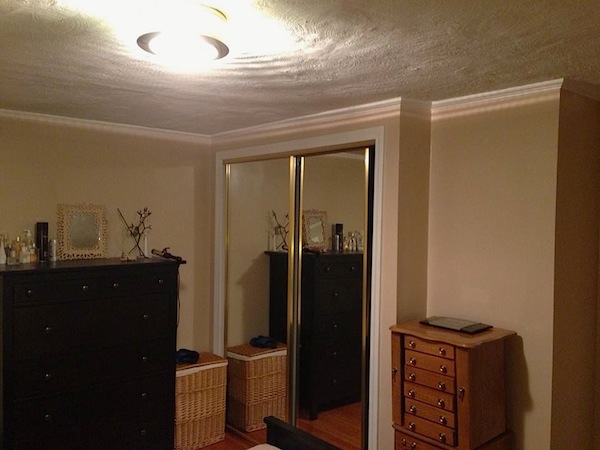
- Did you know that spray paint comes in a ton of different colors? I did not know this and was totally overwhelmed when I strolled in to buy “black-ish” spray paint. You could get super creative and do contrasting colors! I stuck with dark brown/black as I was trying to match the hardware on our other bedroom furniture.
- Frugal tip: hardware is mega expensive, so if you can get away with reusing existing hardware, your project will be significantly more budget-friendly.
Step 8: Reassemble.
- Once all of the pieces are completely and totally dry, put ’em back together.
Step 9: Rejoice and admire!

Here’s a long overdue THANK YOU for this post. I think I knew all this stuff, so maybe it’s that I’m the choir and you’re the preacher? At any rate, earlier this month I finally decided to go from hating my bedroom to repainting my bedroom (see http://miser-mom.blogspot.com/2015/07/purple-yellow-space-and-light.html), and . . . ahhhh. Should have done this long ago. Thanks for the inspiration!
So glad I could help! A coat of pain certainly goes a long way 🙂
Hi Mrs. Frugalwoods,
I just stumbled upon your website today and love this post. My question has to do with the paint sticking to the hardware long term. 1. Did you prime the hardware before spraying it your chosen color, and 2. Did the paint adhere well? I’m considering doing this in a bathroom that gets moderate use. Do you think it will work for that application?
Thanks!
Cathy
My first furniture refinishing job was for an entire bedroom set. Why dip your toe in the water if you can jump right in? There are two paints that you should check out – #1 is Rust Scat (available at Ben Moore stores). No need for primer. Do a scuff sand on the painted surface, clean, and then paint. Looks very good. Great if you need to repaint baseboards that were originally painted in oil-based paint (Rust Scat is water based). #2 option is also available at Ben Moore, and it is called Cabinet Coat. You’ll need a primer coat first (as you did in your kitchen), but man oh man does this stuff come out smooth. Thanks for your great posts