
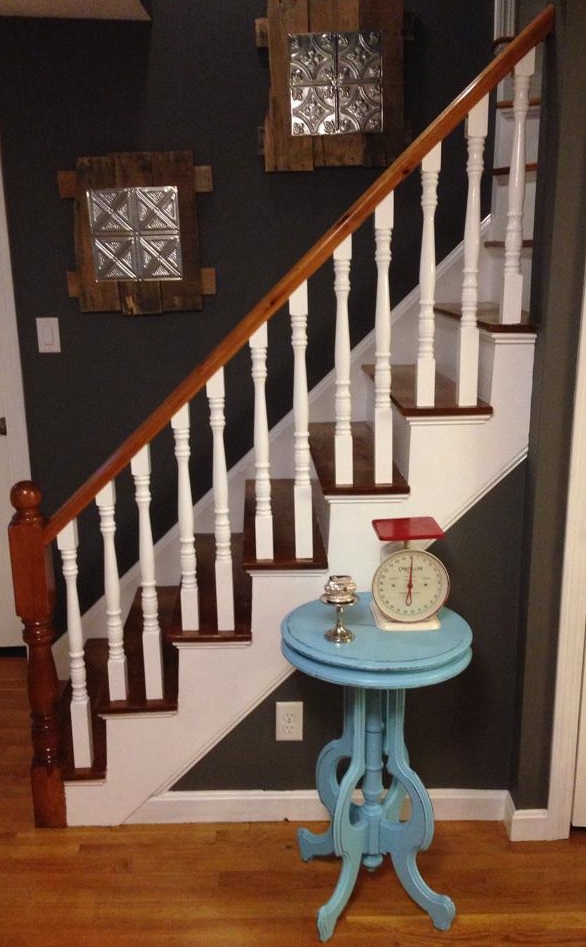
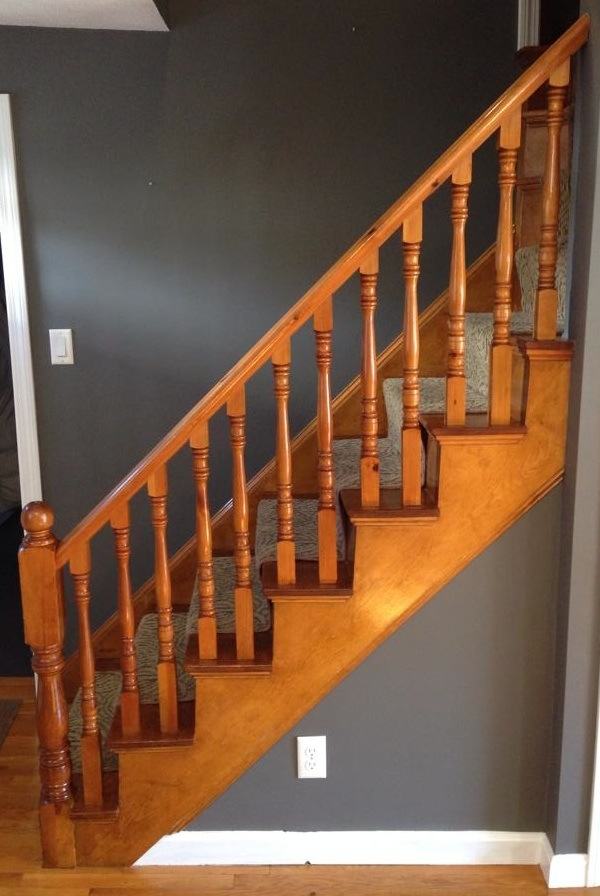
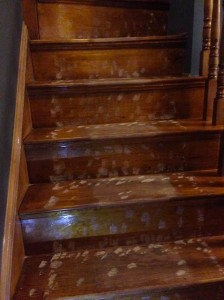
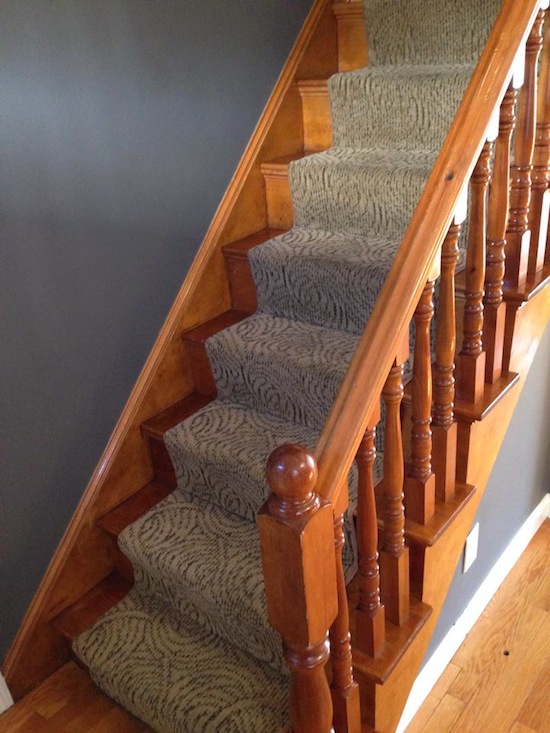
Our staircase was sporting some pretty terrific carpeting and that special ’90s golden oak shine. As the first thing you see when you walk through our front door, it was a mega eyesore. Frugal Hound was the only one in favor as she liked digging her claws into the carpeting. Needless to say, she was overruled.
Here’s how we got from before to after for less than $50 in:
The Frugal Grand Staircase Refinishing Adventure!
Total Cost: $44.50
Supplies:
- Nail puller
- Nail punch
- Wood filler
- Sandpaper
- Polyurethane
- Damp rags
- Paint brushes
- Paint
- Painter’s tape
How To:
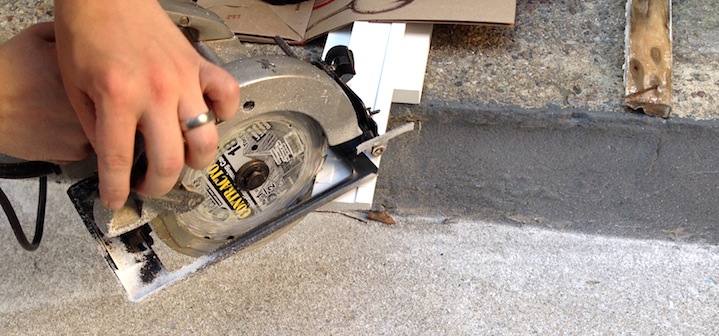
Step 1: Remove the existing carpet runner.
- In our case (see what I did there?), this was vastly easier said than done. The previous owner installed said runner with approximately 1.5 million staples. Poor Frugal Husband pulled staples out for days. Literally days.
- Ways to remove staples: with a small nail puller, by punching them into the wood with a nail punch, or by levering a flathead screwdriver underneath them.
- Supplies: brute strength, nail puller, nail punch, flathead screwdriver/lever.
Step 2: Patch all holes with wood filler.
- We had a great many holes to fill. But, well worth the time to properly fill every. single. one.
- Supplies: wood filler.
Step 3: Sand entire staircase.
- Yes, this is a pain, but, it’s really important for smoothing out imperfections in the wood. Most importantly, sanding removes the top layers of poly/paint/shellac so that your finish or paint will adhere.
- We sanded by hand because we don’t own a sander. It was time-consuming, but super cheap.
- Sanding our spindles was quite a trip since they’re, well, circular. I found it easiest to wrap the sandpaper and around and sort of rub side to side.
- Supplies: sandpaper, hands, patience, This American Life podcasts.
Step 4: Wipe down staircase with damp rags and then vacuum.
- It’s critical to remove all detritus and sawdust kicked up by your sanding efforts. Otherwise you’ll be painting gunk into your final product.
- Supplies: damp rags and a vacuum. A shop vac is highly recommended, but you can get by with a regular vacuum.
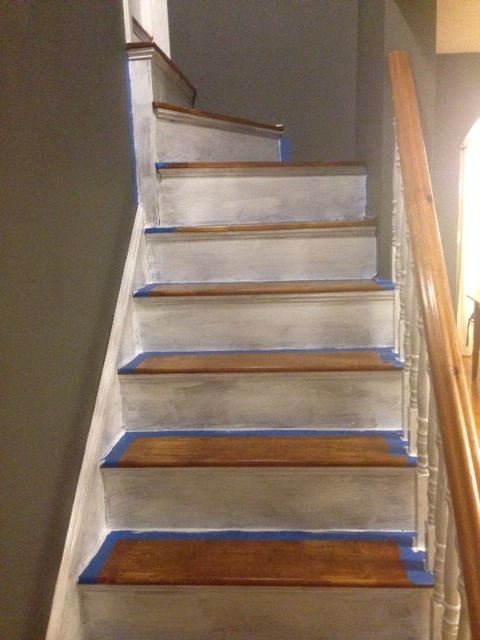
Step 5: Decide which areas you want wood-colored vs. paint-colored.
- There are a shockingly large number of fiddly pieces of molding on most staircases. Decide in advance how you want your colors and finishes laid out.
- Supplies: your brain.
Step 6: Apply polyurethane to all areas you want wood-colored.
- Poly, as it is affectionately know, is pretty stinky and messy. But fear not!
- Wear latex gloves and carefully pour poly onto a rag then wipe onto your surfaces. Try not to drip and don’t glob it on–you’ll likely need more than one coat.
- We did four coats in order to even out the wood color from underneath the carpet runner (it was lighter) and blend in the 1.5 million staple holes we’d filled with wood filler.
- You’ll need to wait a few hours between coats and it’s best to open all your doors and windows for ventilation since poly is smelly.
- Supplies: polyurethane, latex gloves, rags.
Step 7: Tape around the areas you’ll be painting.
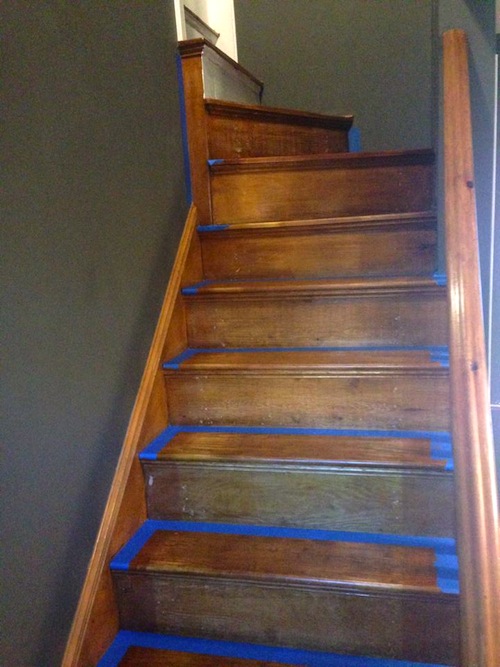
- This is optional, but, we were glad we took the time to tape because of the odd angles involved on a staircase.
- It’s not like painting a flat wall–there’s a lot more nuance here.
- Supplies: painter’s tape.
Step 8: Paint.
- We used regular ol’ brushes and white interior/exterior hi-gloss enamel acrylic paint (Behr Premium Plus Ultra Pure White #8050), which we had leftover from touching up our trim. You could use something more heavy duty, but we figured since we’re not touching the painted areas of the staircase (the treads and handrail are not painted), we’d be fine. And I can attest: so far, so good.
- Painting the spindles was, well, excruciating since they’re circular. As soon as I got paint on one side, it would migrate to the other side and glob up. I had to quickly flick my brush around in order to get it even. I ended up using a tiny watercolor brush to even out the globs.
- Be prepared to do multiple coats–we did three to get the color even throughout. It’s worth the time for an extra coat or two to ensure good coverage.
- Always have a few damp rags close at hand. If you drip paint, wipe it immediately with your rag and it won’t stain or stick.
- Supplies: paint, paintbrushes, damp rags.
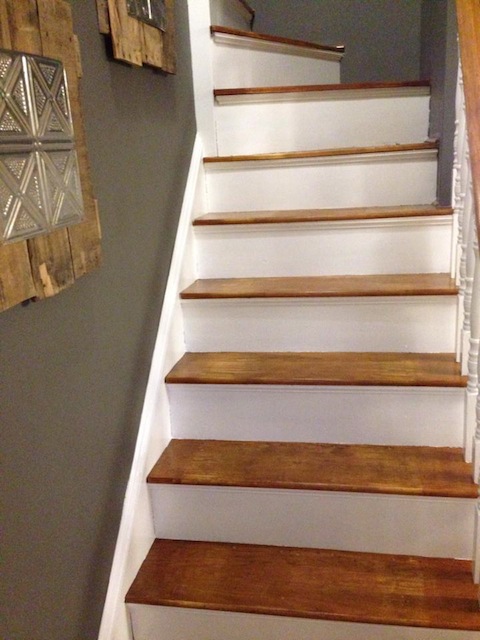
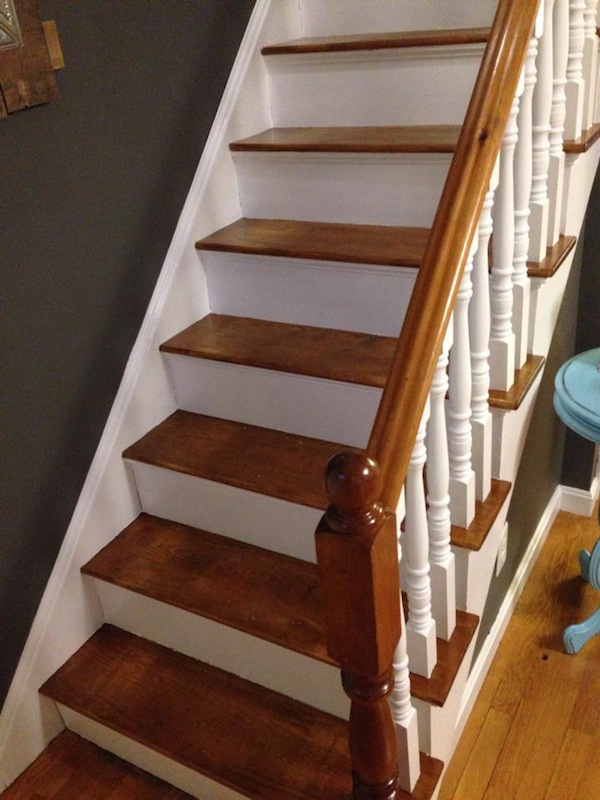
Step 9: Rejoice and admire!


I am about to install a new stair/railing system. Just so you know, I’m going to totally copy your design.
Nice work and nice post!
Thank you! So glad it’s helpful! We really love our “new” staircase–so much brighter and more modern than the carpet situation we had going on before.
OK, I keep on thinking about this post (my job is extremely boring at the moment) and what I can’t get over is the hand sanding part. I’ve done this type of work before and it takes a while with an electric sander. How long did it take you to sand it? On the other hand, I don’t think you sanded it down to bare wood, did you?!?
PS: I love the reference to “This American Life” podcasts! Go Ira! That and your neighbors over at CarTalk have gotten me through many boring tasks.
Dewey, Cheatem and Howe have their offices less than a mile away from our house 🙂
The two of us sanded for 3ish hours by hand. Everything that was going to be painted got a pretty aggressive grit (maybe 80?) to knock off the golden oak lacquer. We weren’t OCD about making it look perfect since it was going to be painted anyway.
The treads and handrail got a progression of sandings to take the lacquer down to something reasonable and then smooth it out. In hindsight we probably shouldn’t have sanded the treads as much as we did… they turned out a little slick!
If I did it again, I’d buy/borrow/thieve a random orbit sander just to make the tread work easier.
But the balusters and the trim pretty much require the human hand. Or something like this awesome festool linear sander:
https://www.festoolusa.com/power-tools/sanders/ls-130-eq-linear-detail-sander-567852
Slightly out of our budget but amazingly cool!
Loos nice! I bought a cheap lathe (really on sale) to do our spindles – of course I had to remove them from the stairs. Folding and holding strips of sandpaper while spinning the spindle made it really fast to do the curved surfaces. Then it acted like a vise to hold the spindle while I sanded the flat sides with the palm sander then rotated 90 degrees for the next side. First and last time I used the lathe but it was worth it for 2 staircases and a long railing separating 2 rooms…
First off thank you for putting this together! Awesome work ! Would love to replicate your results. Few clarifying questions:
When sanding the stairs what series of grit(s) did you use?
What type of poly did you use (oil or water based)?
Did you sand in between the four coats?
If so what level of grit(s)?
Thanks for any time and information!
Do you think that rubbing the paint on to the spindles with a rag or sponge would be more effective than a brush?
no but using a small pain brush with minimal paint will work just great I just did mine that way as well and it was fast and painless
would this work if my stairs are made of plywood?
It could but it’s not going to look as nice as hardwood. Plywood isn’t a finishing wood, I wouldn’t mind it down to an unfinished basement or in a workshop setting but not from the first floor to second floor of my house.
No, plywood has a thin veneer finish and no bull nose.
I’m curious about the wood filler, it doesn’t look to be color matched in the picture. Are you still able to see the filled holes after you poly’d?
Did you prime the wood before you painted?
My staircase is nearly thirty years old and the treads are chipped and worn. Filler would not work on edges. Should I sand it back and add new timber bull-nose?
My stairs are completely covered in a hideous green carpet. Under that they are painted white. Would you recommend paint remover? Or just sanding?
I will be using your design too. Thank you
So happy with my results. My only mistake was not using Benjamin Moore paint like I usually do. I’m having some peeling and will need to repaint.