
March 2019
The sap is flowing, the sap is flowing! Maple sap, that is. Welcome to a special maple-flavored edition of my This Month On The Homestead series. Today I’ll cover the process of tapping our maple trees, running tubes between the trees, and collecting maple sap. Since I used a lot of words to write about all that, I’ll dedicate a future post to the actual boiling of the sap to make the actual maple syrup. It’s a long process, people, and the documentation (at least when it’s written by me) is equally long.
Since we’re in the sticky thicket of sugaring season, all homestead activities this month were related to making maple syrup. Back in October I regaled you with our plans to make maple syrup and now, I’m here with part two of my maple syrup mini-series.
Sugaring (the verb of “to make maple syrup,” which I keep inadvertently terming “syruping”) was a life goal for Mr. Frugalwoods and me. Back in the dream-fueled days of homestead planning, the ability to tap trees on our land and boil their sap into sweet, sweet syrup was on our list of the top 5 things we hoped to do someday. THAT DAY IS HERE.
We have zero aspirations to turn a profit from our homestead-related labors; rather, it’s about fulfilling our desire to live more sustainably and deepen our understanding of working on the land. Plus, as you’ll see, sugaring is so time intensive that we’d have to charge about $700 per gallon to break even. Let alone generate actual profit… so that’s a nope. Our sugaring adventures were mentored and encouraged by Kate from the Vermont Evaporator Company who supplied us with a sap evaporator (which I always want to call the evap-o-tap for no good reason) and a bounty of sugaring intel.
While I’m currently drinking gazing at some glorious finished maple syrup on my counter, today I’m starting at the beginning of this season’s journey. To begin at the REAL beginning, go back and read How We’re Preparing To Make Maple Syrup.
If you’re just tuning in, this is a recurring series in which I document each month of our lives out here on our 66-acre Vermont homestead. After leaving urban Cambridge, MA in May 2016 to chart this wholly different life, we’re experiencing a constant learning curve of exploration and plenty of stupid novice moments. Check out last month’s installment here and enjoy the best and worst (ok, mostly the worst) moments of our first year on the homestead here. Wondering if it’s less expensive to live rurally? Check out: City vs. Country: Which Is Cheaper? The Ultimate Cost Of Living Showdown.
Gathering Our Sugaring Supplies
As all good homestead projects do, our sugaring adventure began with gathering supplies. So many supplies. We are the proud owners of SO MUCH homestead stuff that it’s a good thing we have a barn to store it all in. Sidenote: in case you’re wondering if it’s more expensive to live on a homestead than in the city, it is. Read why here.
Below is an itemized list of everything we bought to facilitate the first part of sugaring (getting the sap out of the trees). I’ll explain what everything was used for in a momentito.
Purchased from Bascom Maple Farms in Alstead, NH:
- 3/16th tubing (2 rolls of 600 feet each)
- Taps
- Tees
- Closed End Tees (for the beginning and end of line)
- Unions to splice 3/16th tubing to itself
- End clips to secure tubing around the tree you begin at
- Fittings that translate from 3/16th to a quarter inch
- Vacuum gauge
- Tapping bit
Purchased used from our local barrel guy (I’m not making this up, that’s what he goes by):
- 275 gallon sap collection tank (food grade, previously held ethyl alcohol)
- 55 gallon sap holding barrel (food grade, previously held spicy pickles)
Purchased from Amazon:
- Bulkhead rain barrel spigot fitting (affiliate link)
- 12 Volt DC Pump (affiliate link). Note: we haven’t been using this pump for very long, so we can’t speak to its longevity. It has worked for us so far, but it’s not a very heavy duty pump.
Stuff we had around the house:
- Twine
- Thermos (to hold boiling water)
- Sharp scissors to cut the lines (a tubing cutter would be better, but we didn’t want to buy one)
- Hoses: 6′ length of hose to be intake for pump (goes down into the tank); 25′ hose to go into the barrel from the pump; 6′ hose coming off the bottom of the barrel to drain into the water jug
- Step drill bit to install the rain barrel fitting
- A hammer
Step 1: Identify Maple Trees
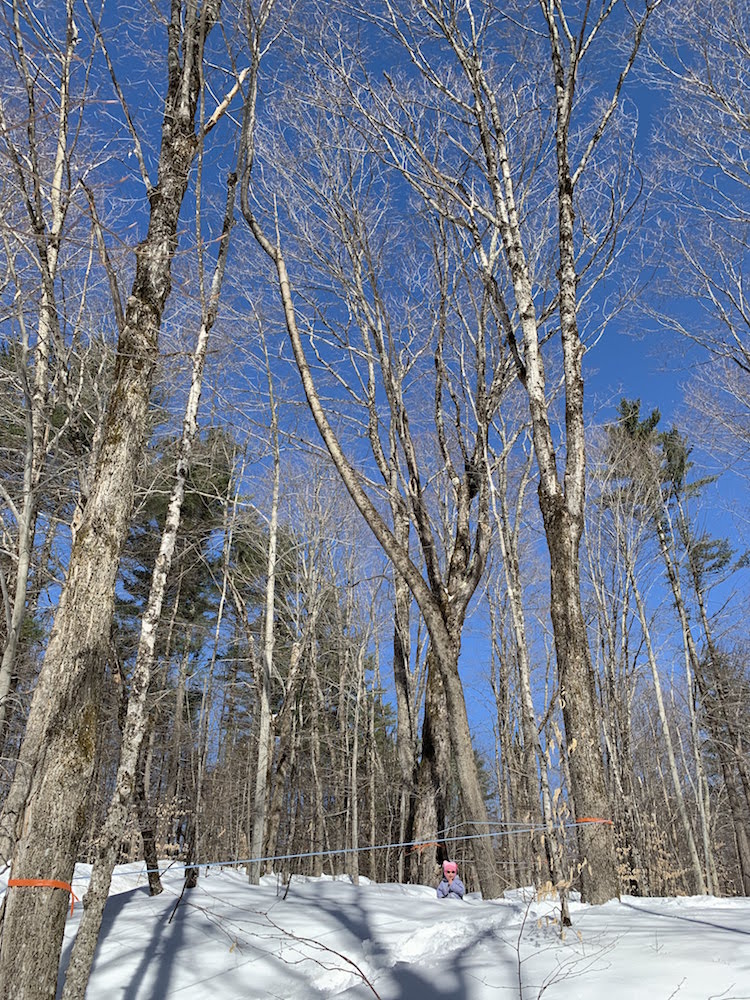
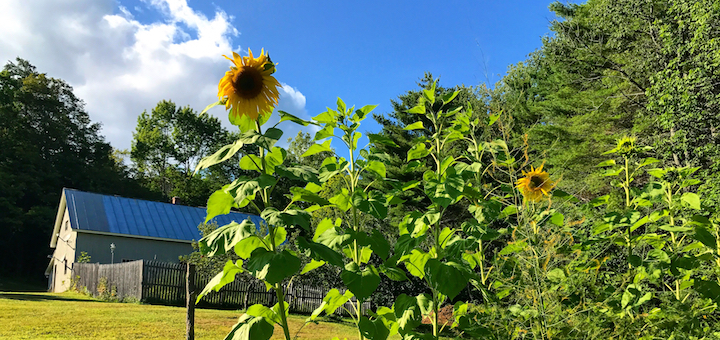
The first step was to identify which of our maple trees we wanted to tap. Mr. FW located 24 sugar maples running along the slope of our driveway (more on why that’s important below). He flagged them with orange ribbon for easy ID. They felt so lovely and special. The trees you tap for syrup are officially referred to as a “sugar bush.”
We have an epic number of maples on our property, but as we’ve learned, you want to keep your operations as close to the house and barn as possible. Tapping maples way off in our woods would equal more time and more work.
This is also why all of our gardens are clustered around our house. Despite having 66 acres of land, we find it’s most efficient to concentrate labor-intensive projects within a few acres of the house and barn.
Step 2: Choose Buckets or Tubing to Extract Sap from Trees
As we established back in October, maple syrup comes from the sap of maple trees. Hence, the first step in the process is to get the sap out of the trees and into some sort of collection tank. Some folks use buckets, whereby you stick a tap in the tree, hang a bucket under the tap, and collect buckets full of sap. This is BY FAR the more photogenic, Instagram-friendly method. However, it’s also a lot more labor intensive since you have to–ya know–walk around and collect each bucket. Being lazy/time-pressed part-time quasi-homesteaders with two children too young to collect the buckets for us, we opted to go for the far less lovely, but far speedier tubing system.
Tubing entails running tubes from maple tree to maple tree, collecting sap from each tree and funneling it seamlessly into a single, large collection tank (in our case, the 275 gallon food-grade container we bought from The Barrel Guy–not a business name, just his actual name).
If you’re tapping just a few trees, buckets would likely make more sense. However, we find ourselves unable to do anything halfway and so, we tapped 24 trees, which made tubes more efficient. Additionally, we’re blessed/cursed with a large slope along which many maple trees sit. Given this, we have a gravity-fed system whereby sap flows down the tubes by virtue of the tubes running down a hill. Double win for tubes right there. Tubes would make a lot less sense if we didn’t have the advantage of gravity on our side to pull the sap down (you could run a pump, but that ventures into a more commercial-scale operation).
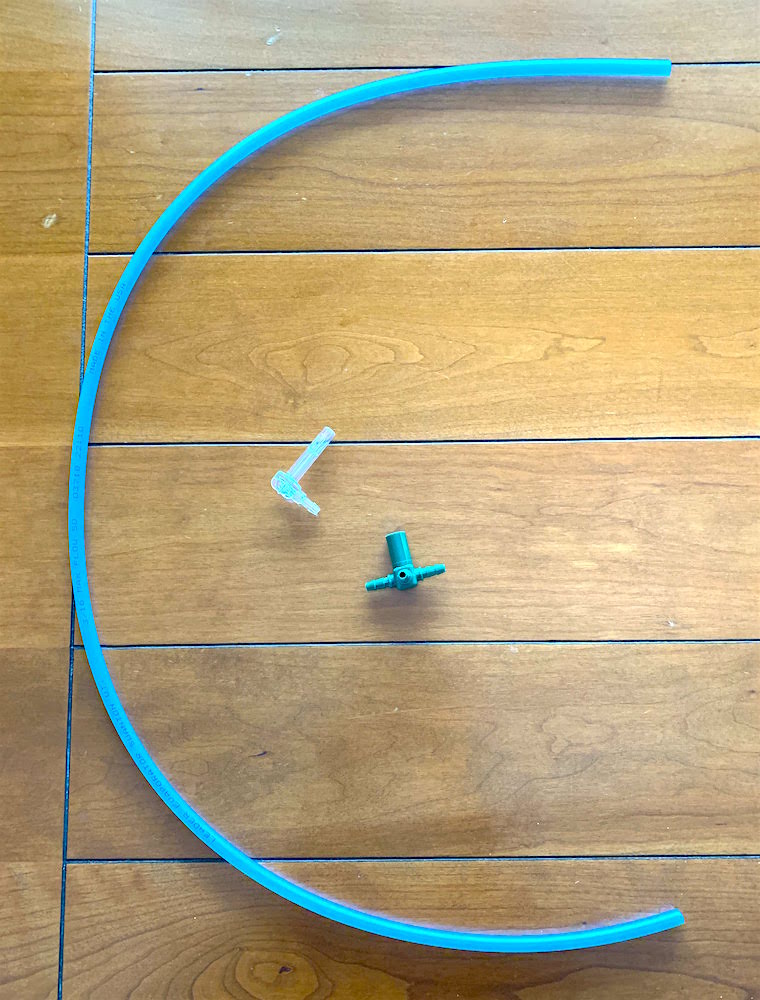
Step 3: Make Drop Lines (toddler-friendly activity)

Mr. FW and Kidwoods made drop lines early on in the process because this can be done indoors near the warmth of the woodstove. This is a kid-friendly activity and, at three years old, Kidwoods was delighted to participate. Littlewoods–at age one–not so much.
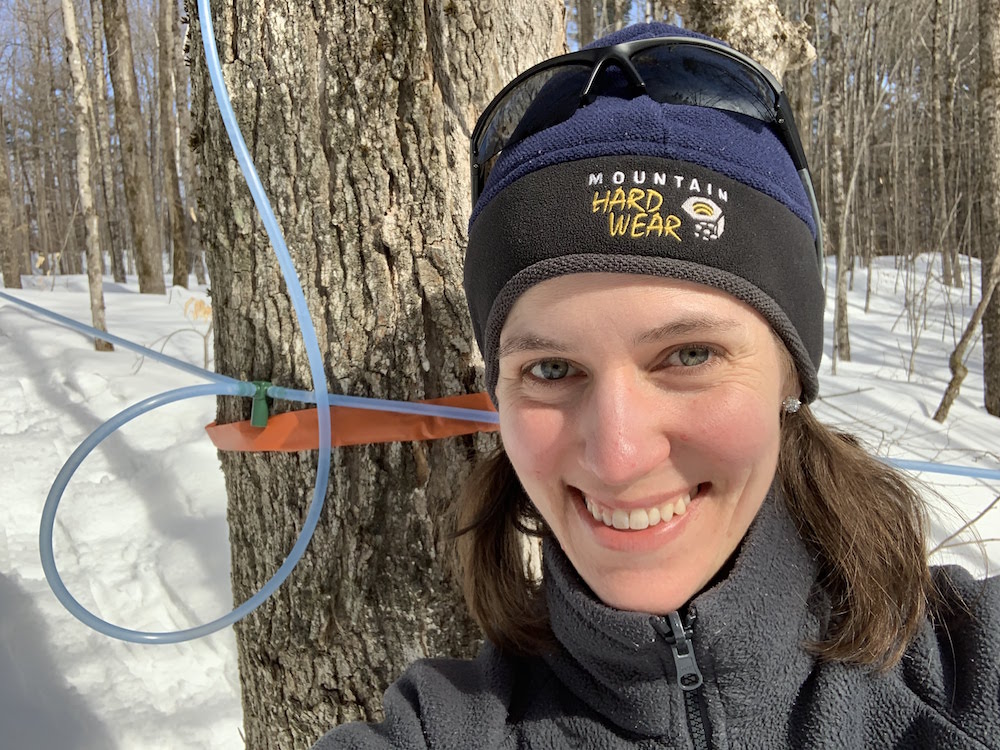
Drop lines run from the tap in the tree to the main tubing line. They serve as each tree’s personal sap conveyance device. Here’s how to make them:
- Cut tubing into 36-42 inch sections
- Dip the ends of each tube into a thermos of boiling water for five seconds. The rubber of the tubing isn’t pliable enough to insert the T and the tap, but by dipping the ends in boiling water, the ends become loose enough to allow the T and tap to be inserted.
- On one end of the tube: insert the T.
- On the other end of the tube: insert the tap.
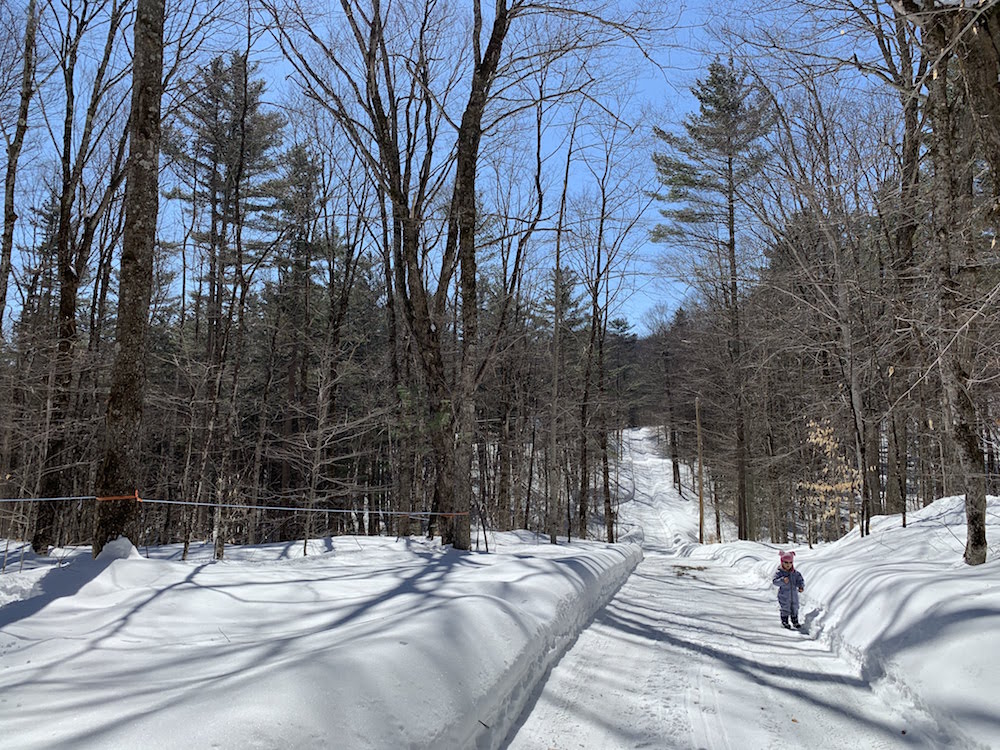
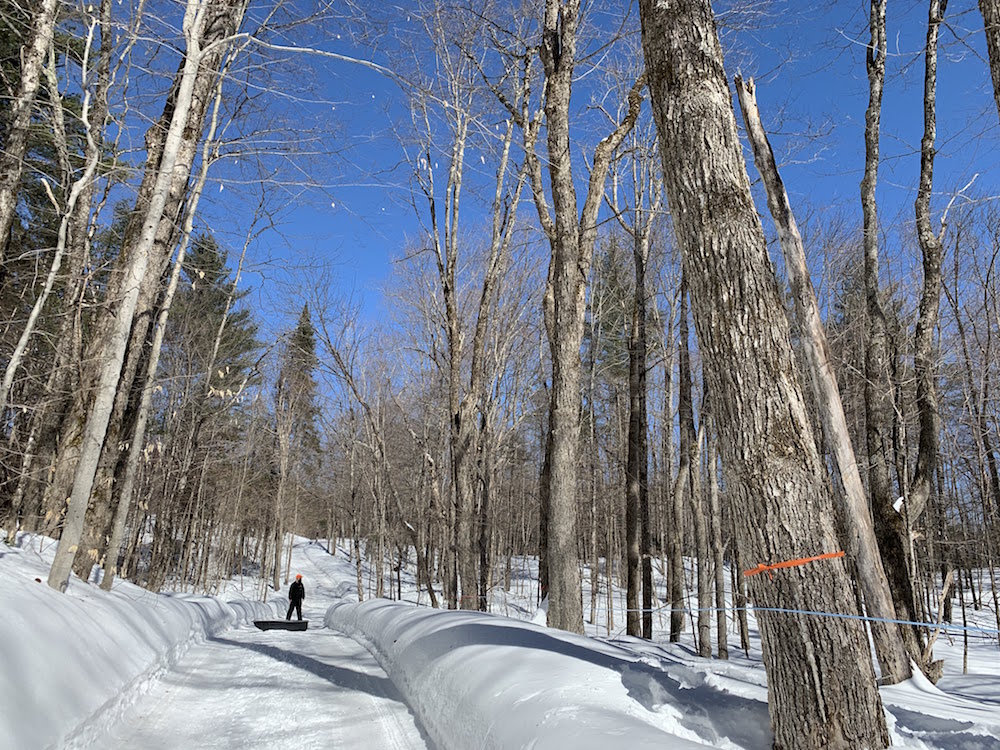
Step 4: Run Tubing Between Trees
Let me start off by saying that this would be a good thing to do before there’s four feet of snow on the ground. But it wouldn’t be the Frugalwoods Homestead if we did things at the optimal time and in the optimal way.

Mr. FW started at the top of the hill, with the first of the 24 trees he’d flagged. Flagging the trees was a useful exercise because it made it easy for him to map out where the tubing would go. He then wound the tubing between all 24 trees, sometimes using neighboring trees to help keep the line taut.
This sounds simple, doesn’t it? Spoiler: it was not. Second spoiler: it would’ve been easier if there weren’t 95 feet of snow on the ground, a screaming toddler, and 1.5 adults. Two adults, no children, and no snow would’ve made this chore quite a bit simpler.
We were all in our snowshoes and kept breaking through the crust of snow, which involves having your leg plummet several feet into a personalized snow cave. You then have to lean forward, find solid footing, and lurch your buried leg on top of the snow pack… while holding the tubing, which needs to be kept taut in order for this whole operation to have a prayer of working.

It was a glorious, sunshiny day and I envisioned Kidwoods would play in the snow as her dad and I strung tubing. Perhaps she’d even follow along the tubing lines with us. I had the idea that this day would be the stuff of childhood idyl. Memories would coalesce of sugaring with her parents. As an adult, she would regale friends at dinner parties with tales of a childhood spent in the company of loving parents, a joyful younger sister, and sugar maple trees.
Instead, she flopped in the snow and wailed. Tragedy, evidently, overcame her and the only solution was to tantrum in the sugar bush. There was no apparent reason for this demonstration, other than the reason for everything: she is a threenager.
Given this, my assistance was short-lived and Mr. FW had to manhandle the tubing on his own, while in snowshoes, while ensuring the line stayed firm around each tree. But, as he so often does, he managed it.
With Mr. FW wrangling blue tubes in our woods, I carried Kidwoods inside where she proceeded to ask to go back outside. I demurred and we settled on reading books about snow instead. Lord, please deliver me from age three. At least until I have to repeat this stage with Littlewoods, who is–at present moment–such a content person aged one year, two months.
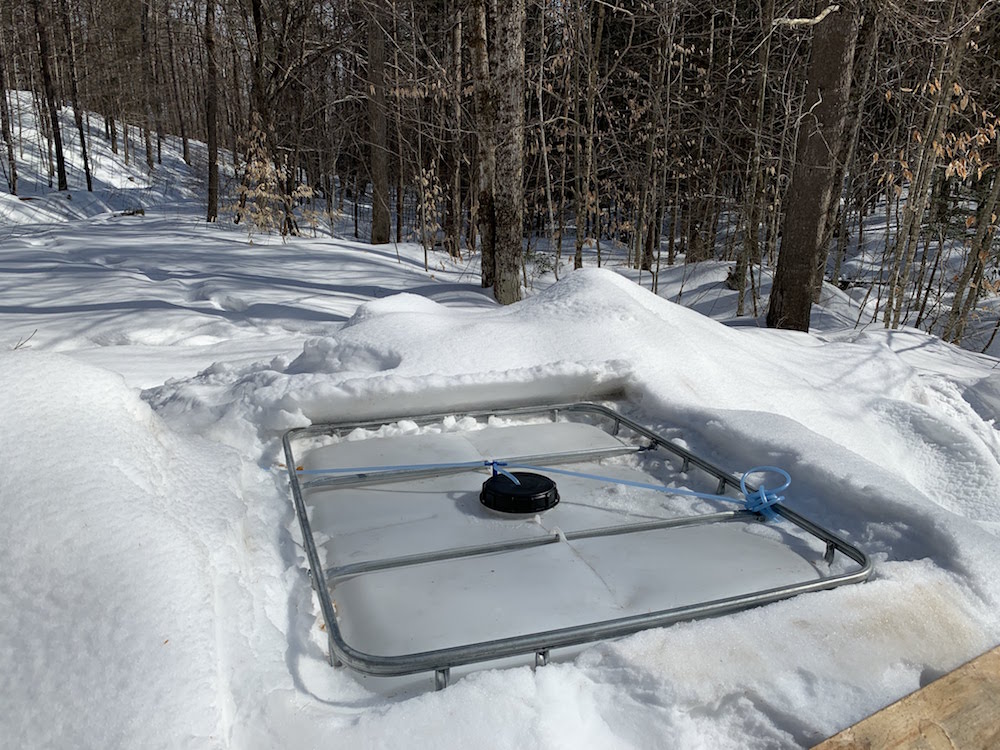
Step 5: Position Sap Collection Tank
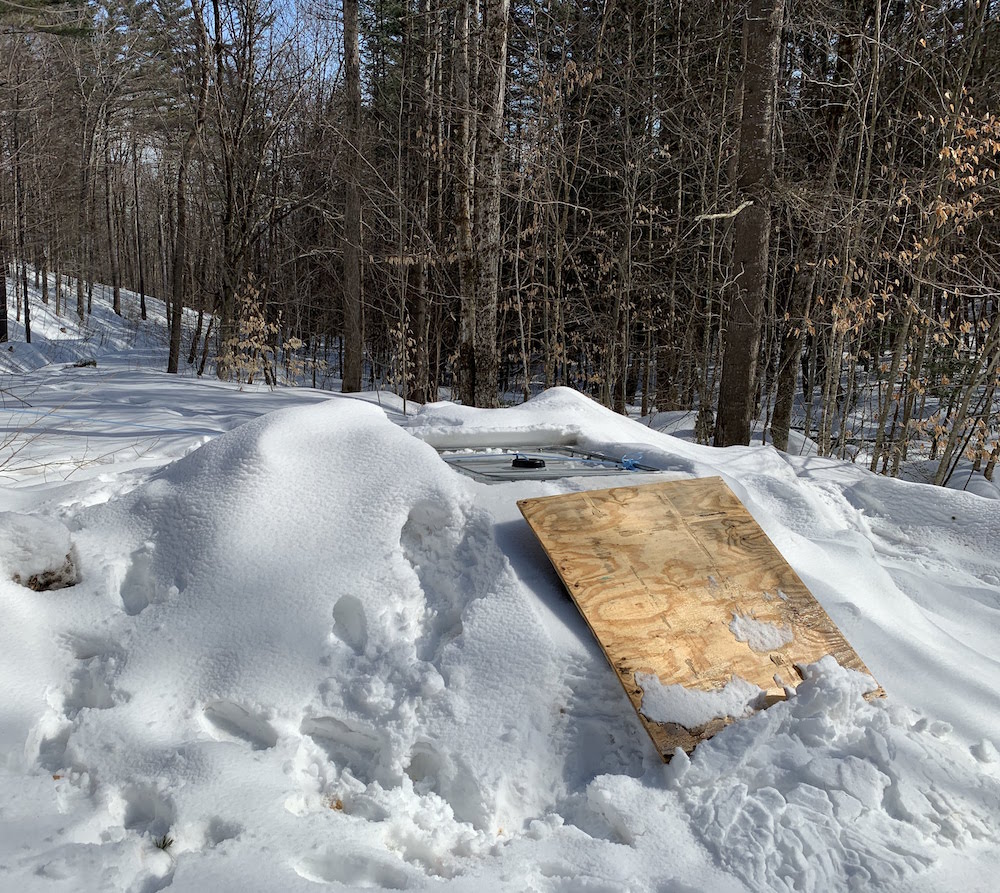
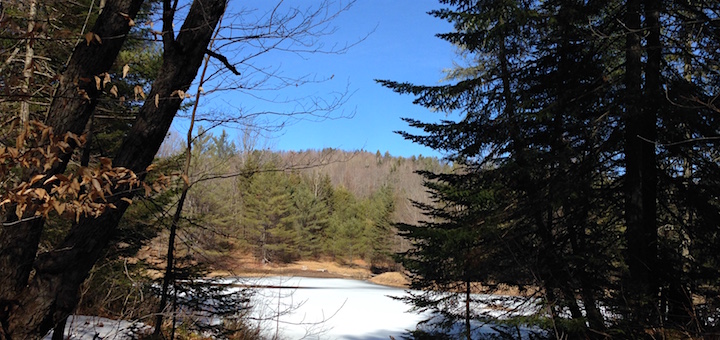
Having 100% given up on my dream of “family maple day,” Mr. FW proceeded to situate the collection tank at the bottom of the tubing lines. He positioned the tubing line such that it terminates on the road to our pond, which means the collection tank has a wide, semi-flat spot to rest. Let’s not forget there are still 809 feet of snow on the ground.
In order to settle the tank, Mr. FW pulled out a shovel and dug a hole in the snow for the tank to reside in (also he used the tractor bucket to dig). Here’s where all that snow becomes useful: it keeps the sap in the tank nice and cold, which is an ideal sap storage environment.
He slid a piece of plywood on top of the tank so that when it (inevitably) snowed next, he wouldn’t have to clear off the tank–he’d just slide the plywood off. Since it has snowed more times than I care to admit since placing the tank, I can report that this system totally works. At present, as the sun makes a more striking appearance each day, this fashionable plywood topper acts as a shade so that the sap doesn’t get too warm. Warm sap = bad. Cold/frozen sap = good.
Step 6: Cut in the Drop Lines on the Main Tubing Line
It’s time for those long-ago-made drop lines to make their outdoor debut. As is usually the case, there is a special tool for this work–the 3/16″ Two Hand Tubing Tool–which makes the job a cinch. Did we buy this $120 tool? We did not. Should we have bought this $120 tool? Probably so. Did Mr. FW MacGyver his way through anyway? Of course he did.
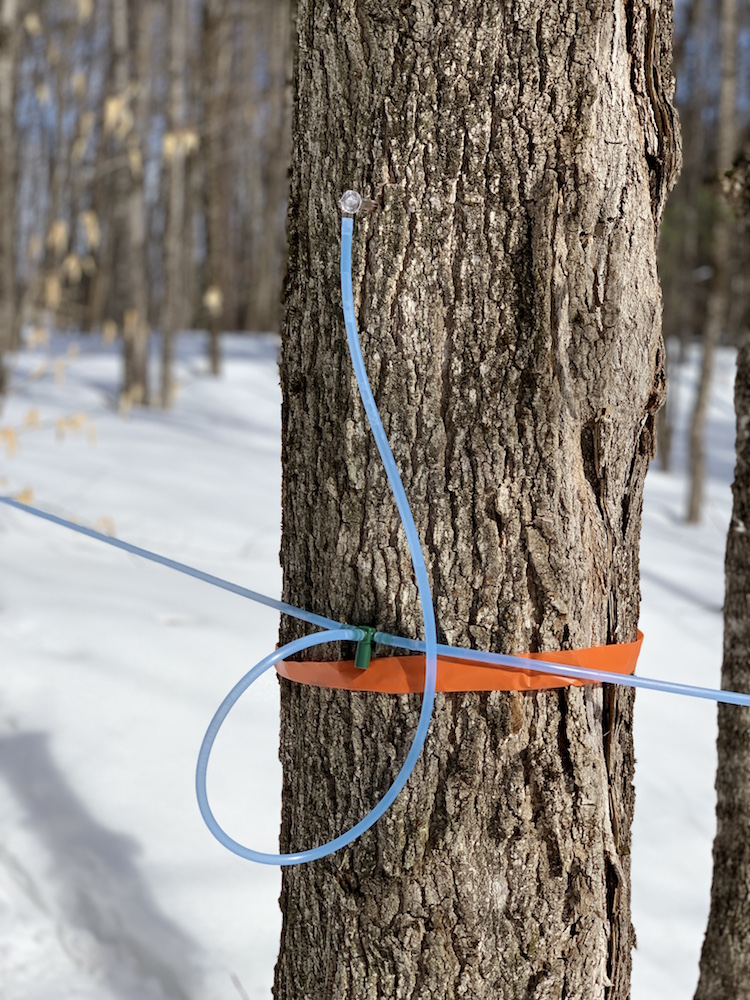
The goal here is to splice the drop lines into the main tubing line and tap the tree. Voila! Sap be flowing. Not so fast, fair maple friends. This turned out to be one of the more fiddly/frustrating components of the entire process.
To cut in drop lines:
- Mr. FW had to hold the tension in the main tubing line (remember, it’s strung between the trees and supported only by tension).
- Then, he cut the main line and inserted a drop line at each of the 24 trees.
- When he cut the line in half to insert the T, unsurprisingly, the line wanted to spring away (doing so would unravel the entire tubing system. Eeek).
- The special tool I mentioned features two clamps and a cutter and one simply clamps the line and the tool inserts the T for you. All in one! Not what we did!
- Mr. FW replaced that nifty tool with a variety of items:
- He took a piece of 4 foot long twine, doubled it over, tied one end with a tight two half-hitch knot, grabbed the main line, twisted it around his arm, tied two half-hitch knots, which allowed the twine to hold taught. Hence, the tubing could be cut without losing tension.
- Next, he followed the same procedure he used when creating the drop lines. He dipped the end of the main tubing line into a thermos of boiling water for five seconds. Dipping it in the boiling water loosened it up enough that he could slide the T into the line.
- Cutting in T’s is also an opportunity to remove any slack from your line as you can cut out a section of tubing if needed.
- Finally, he released the tension and the drop line was set.
All of this was done by him alone, on snowshoes, in four foot deep snow, while juggling a thermos of boiling water. He proved it can be done without the special tool, but he reports he 100% understands why the tool was invented. And, while egregiously priced, he advises that if you’re doing more than 24 taps, you should probably go ahead and buy it.
At this point, he had the main tubing line and the drop lines all set up.
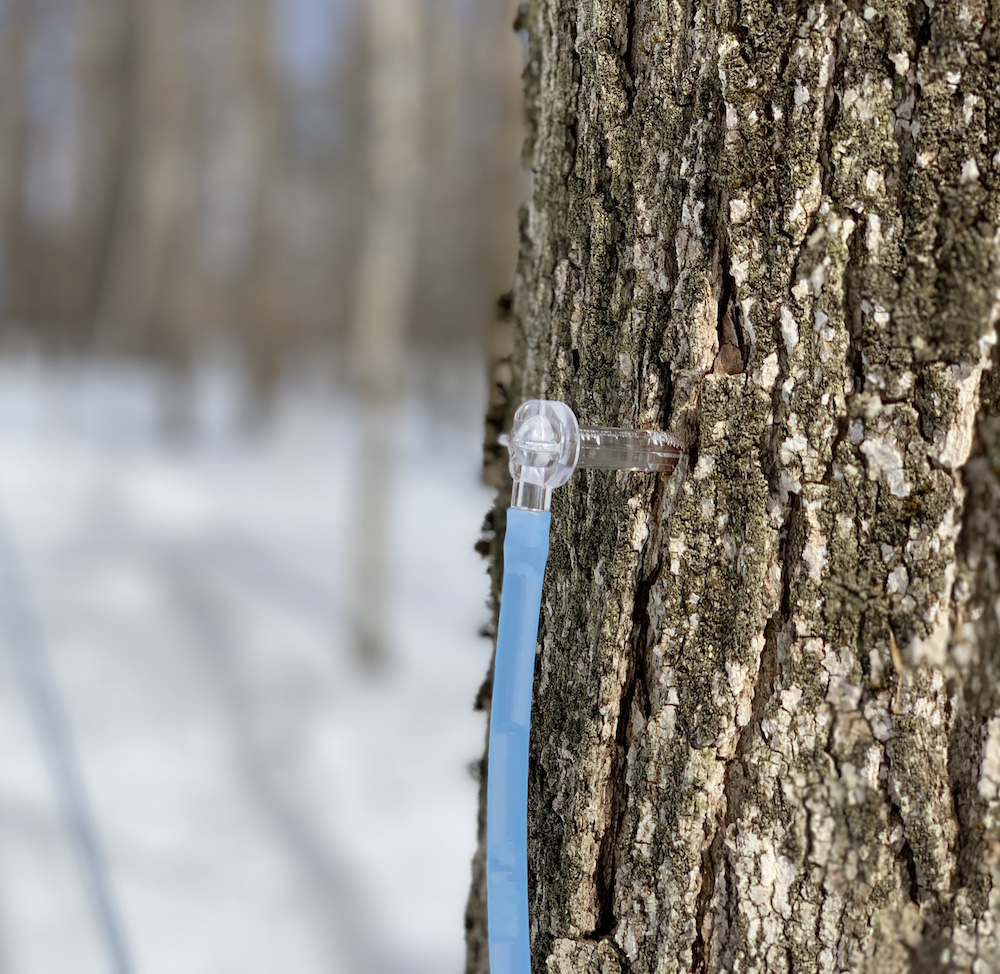
Step 7: Install Vacuum Gauge
Next up, Mr. FW installed a vacuum gauge at the beginning of the line (top of the hill, first tree) to determine if the tubes were actually pulling a vacuum. The max vacuum level is 27 inches, and we pulled 16 inches at the top, which is sufficient for our needs.
The reason to use 3/16 tubing (as opposed to larger, more conventional tubing) is that it produces a natural vacuum when used on a slope. As it flows downhill, the sap in the tube pulls more sap out of the trees. This also prevents the holes in the trees from closing as quickly.
This system should yield more sap per day and enable the sap to run for more days. In theory, you can double your sap yield by employing a vacuum like this.
Step 8: Insert the Taps into the Trees
Then, we waited until the weather was ripe for a sap run and we tapped the trees. This turned out to be the easiest part of the whole project. We didn’t want to put the taps in prematurely, but we also didn’t want to miss a sap run, so Mr. FW monitored conditions and bolted outside when he judged the weather just right.
Sugaring season is slightly different every year as it’s entirely temperature dependent. According to the Vermont Maple Syrup Makers (whose annual conference Mr. FW attended): “A pattern of freezing and thawing temperatures (below freezing at night and 40-45 degrees during the day) will build up pressure within the trees causing the sap to flow from the tapholes.”
You need to get a drill bit that’s specifically made for tapping maple trees. The advantage of using the appropriate bit (which is about $6) is that it yields the exact right size hole for the tap and creates a cleaner hole, which ensures optimum sap flow.
Mr. FW drilled 1 and 3/4 inches into each tree. When you do this, you want to see blonde wood in the shavings. If you see darker wood, you’ve drilled into a rotten or dead part of the tree. You’ll want to drill in another part of the tree until you find a spot with blonde wood. After drilling the hole, Mr. FW placed the tap in the tree and LIGHTLY tap tap tapped with a hammer. That’s it! As you’ll recall, the taps were attached to the drop lines in Step 3, so we’re now all set for sap to flow.
Step 9: Watch the Sap Flow
Now began the process of Mr. FW and I dashing out to check on the lines at every opportunity, just for the joy of seeing the sap flowing through them. The tubing is translucent, so I was thrilled to discover you can sorta see the sap on the move. I carefully documented sap flowing in a video and triumphantly showed it to Mr. FW, who gently informed me that I’d painstakingly recorded an air bubble. I stand by it because it COULD have been sap.
Step 10: Prepare Ye Pickle Barrel
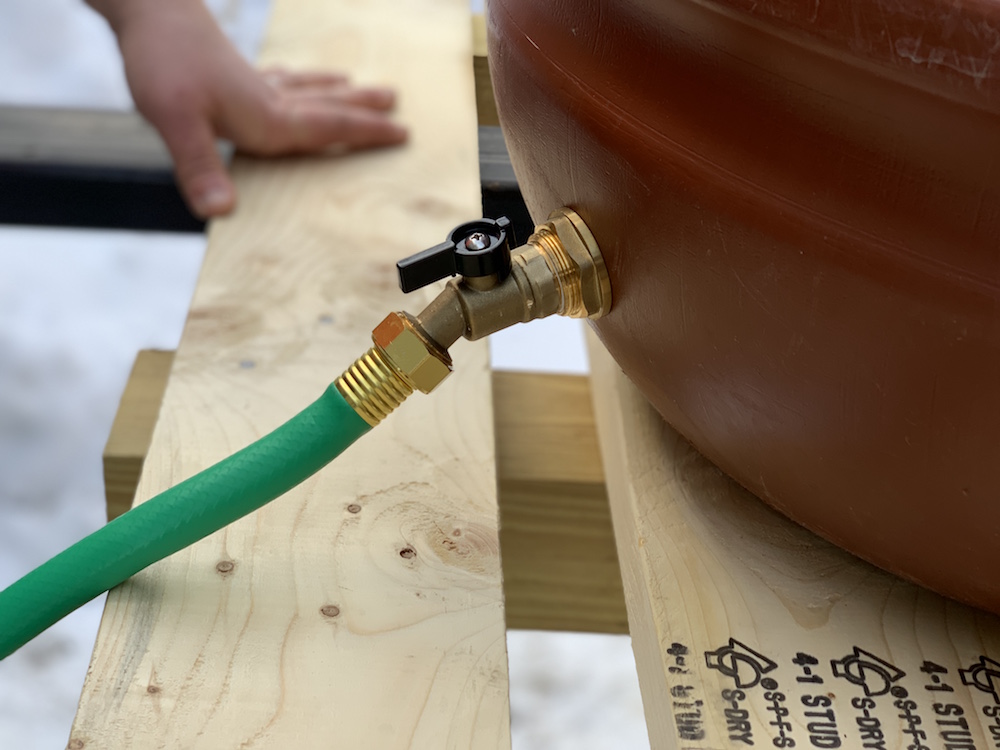
Enter one 55 gallon food-grade barrel formerly used for spicy pickles, sourced from our local barrel guy, to be used as an intermediate sap storage container. Mr. FW washed the interior of the barrel three times with hot water and dusted it with baking soda twice. The interior still smells faintly of pickles, but I can report that the finished maple syrup doesn’t taste like spicy pickles.
After washing out the barrel, Mr. FW built a pallet platform so that the barrel can ride comfortably on the pallet forks of the tractor. Next, he added a bulkhead fitting and valve (a spigot in my book) to the bottom of the barrel so that we can use gravity to drain the sap out of the barrel. He then strapped the barrel to its custom-built pallet atop the aptly named pallet forks and trundled off to the collection tank.
Step 11: Transfer the Sap from Tank to Barrel
Once a respectable amount of sap had flowed out of the trees, down the drop lines, through the tubing, and into the collection tank, it was time to transfer the sap.
The collection tank’s pro is that it’s HUGE. At 275 gallons, it is VASTLY oversized for our needs, but we knew we wouldn’t have time to transfer sap out of it everyday and we weren’t sure how much (or how quickly) sap would collect. Better to go too big than too small, we reasoned.
Plus, thanks to the snow blanket the tank is encased in, the sap can hang out for awhile before being boiled. We left one batch in there for a week and a half and it came out fine. If it gets warm, the sap can get gunky. But if frozen, it’s fine.
Since the collection tank is massive (and buried in snow for refrigeration purposes), it’s not easily portable. This is what the pickle barrel is for: to transport sap from the tank over to the evaporator, which is located next to our barn. The evaporator is what we’ll use to boil all this tree juice into syrup.
To pump sap from tank to barrel, Mr. FW hooked up a 12 volt DC pump to the tractor battery, which served to suck the sap out of the collection tank and into the former pickle barrel. Of course the cord for the pump wasn’t long enough so he had to cut it and splice in a longer cord. He reports that this system, “works great” (that’s a direct quote).
Step 12: Drive the Sap to the Evaporator
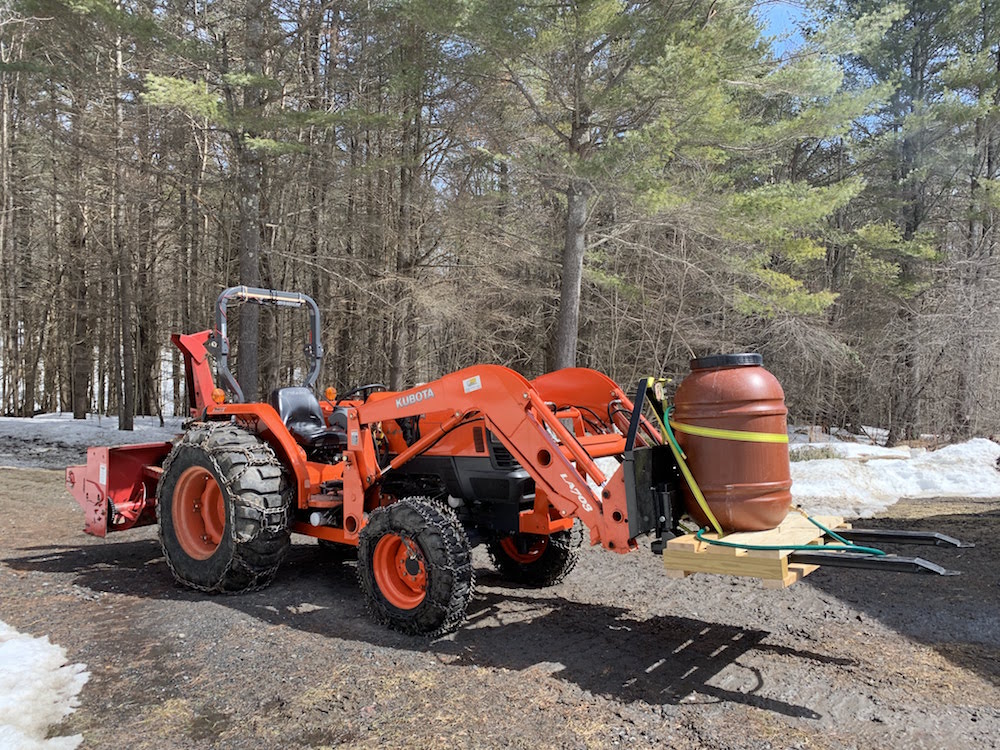
Not much commentary to add here. After transferring the sap from the tank to the barrel, Mr. FW drove the barrel (strapped to the tractor) over to the evaporator.
What happens next will be covered in my upcoming installment of Maple Sugaring On The Homestead: The Thrilling Conclusion to Our Inaugural Year As Sugar Makers. Spoiler alert: it involves boiling the sap on the evaporator down to syrup! Bet you never could’ve guessed.
Solar Check
Now that I’ve FINALLY (it only took me a year… ) written up the background information on our solar panels, I’ll include a solar update every month in this series. This is the only way for me to remember that: a) I have solar; b) you all would like to be updated on it.
In March we generated 659 kWh, which is a fabulous trouncing of the paltry 70.4 kWh we generated back in January. Spring cometh and snow doth slideth off ye olde solar panels.
This has been your solar production update. You’re welcome.
Want More Fotos?!
While I only document homestead life once a month here on the blog, I post photos to Instagram (almost every day!) and updates to Facebook with much greater regularity. Join me there if you want more of our frugal woods.
Some folks have asked about this and yes, I do try to post a picture to Instagram every day and–unlike with many other things in my life–I actually have a pretty good track record. If you’re craving more homestead pics, Instagram is your best bet.
If you want to make sure you don’t miss a post here, sign-up for my handy dandy email list in the box below. You’ll get a message from me if you do… On to April, frugal comrades!
What an interesting post! I’m looking forward to your update on the sugaring-off dance that I’m sure you’ll hold when everything is finished, with Aunt Docia and Aunt Ruby in dresses with buttons that look like blackberries, just like in the Little House on the Prairie books. No? Seriously, this is really fascinating, thank you for sharing it.
Your daughter reminds me SO much of mine (who is almost five now and still gets screamingly angry for what seems like no reason). They’re the kind of kids who will be strong and independent and make great leaders when they get older, if we don’t eat them before they age into adulthood. Hang in there!
I know you said this was costly and wouldn’t make money. Which is fine. It’s memories and the experience! But how much did this all cost and are tax breaks available?
That’s a great question! I should tally it up and include that in the post.
My husband and I discussed making maple syrup as other family members have done so and we figure we are going to try it, hubby bought a used woodstove at a very good price because it was in a basement and others who had come to look at it, had no idea on how to get it out. So my cousin, nephew and a couple strong 20 something boys assisted him in strapping the stove which weighed hundreds of pounds to a furniture dolly and hoisting it up a track of 2×10 boards to get it out.
The stove is going in a greenhouse he is building this summer and the stove will heat it and also be used to boil down the sap next winter. My uncle used a propane burner the first time he did his syrup and it was expensive to keep refilling the tanks. After that he burned wood. We figure we have the wood on the property, so that will reduce our price. Hubby bought two of the 55 gallon barrels just like the one you have. They had been used for greek olives in them. So they will require a good scrubbing out and sanitzing before we do maple sap in them. I use the sanitizer hubby got at the homebrew store for his carboys to sanitize glassware, the coffee pot, and my coffee mug, it gets them really clean. I don’t want olive flavored maple syrup. He currently has one on the back of his tractor he filled with water to have weight over the rear tires for snow clearing as a bucket full of snow shifts the center of balance on the tractor and can cause tipping. He figures he may as well use it when he is moving gravel in another couple months for the same reason. And he figured using the second as a collector for the maple syrup would work as well. Thanks for the tutorial on how you did yours. It is funny you are using the same barrels we are planning to. The blue barrels cut in half are good for planting potatoes and composting, but not so much for maple sap collection. The 275 gallon water container looks interesting and I will mention it to my husband that one might be a good idea in the greenhouse he is going to build versus dragging a house out each day to water plants. My uncle told us he figures that 55 gallon barrel filled with sap will yield about a gallon of syrup. So as you mentioned, this is not a commercial operation, for our own use only. We are getting more bees the end of the month as the colonies we had died off over the winter, seems all the local bee keepers in our area had that same problem. But we love the honey and it is our plan to sell honey as a side gig, every time we extract and I let friends know we have honey, it goes very fast. There are a lot of start up costs with keeping bees, extracting and jarring honey. So we probably won’t be cash flow positive until next year. But the colonies of bees do an awesome job of pollination in our garden. I was surprised (and a little unnerved) at the number of bees on our blueberry bushes last spring, my husband said it was a beautiful sight and you could hear them all buzzing at once. Of course he doesn’t mind opening the hives with thousands of stinging insects, and I will not go near them. This weekend we are planting kale, spinach, parsley and arrugalo in raised beds as the dirt has thawed. The tomatoes, peppers, onions, squash, melons and the rest will go in the end of next month. While I love the look of snow, I will be glad when the weather warms and the muddy fields dry out some so I can be working in the garden.
Prepare Ye Pickle Barrel – you crack me up!!
Have you made jack wax yet? Maple syrup boiled down and poured on snow to make taffy. One of my favourite memories growing up is helping neighbours collecting sap. We got lots of maple candy from them to scrape on toast.❤️
Yum! We haven’t tried that yet! But we still have plenty of snow, so we should.
We made our own maple syrup for a good 10 years or so when I was a child, though much more casually* than your set up. Key thing for you to keep in mind for next year: very often, the “first run” of sap results in a much more delicate, lighter, beautiful maple syrup than the sap produced the rest of the season, so you may want to consider boiling down the first day or two of sap seprately instead of waiting for a full week’s collection. (You may already know this from the How To class, but commenting and mentioning just in case not.) The first run batch was always the favorite of the season for us. As for the * above: we’d tap on Super Bowl Sunday, about 5-6 trees on the property of willing neighbors as turns out we only had swamp maples on our property in CT; used buckets we’d have to collect once or twice a day depending on weather and trees (as some trees are good producers and some not); sticky up the kitchen boiling down the sap and learning how to time the double boiling when syrup would be just right; and take out the taps right before Spring Break. I have wonderful childhood memories of all this, though I’m sure I grumbled some (lots?) in the moment when I didn’t want to go out and collect sap – and will likely be the same for your kids too. Tamara from MoC 2.0
Thank you for the tips! I thought I recognized your name :). I am SO HAPPY to hear that you do indeed have wonderful childhood memories of sugaring. My kids are definitely on board for eating the syrup at this point ;).
The option of making your own maple syrup from your own trees has always been so fascinating to me, probably partially because it isn’t an option for us here in the Pacific Northwest.
As far as our little quarter acre urban homestead is concerned, things are FINALLY starting to sprout (way later than normal thanks to an extra cold and snowy winter). The rhubarb is coming up now, and while I can’t make maple syrup, I can make rhubarb syrup 🙂
Just a quick comment- I didn’t see in this post and in your post from October the minimum size required for a tree before it can be safely tapped. We just went to a sugaring off event and they mentioned more than once that you couldn’t tap a tree with a too small diameter of trunk because those trees need all their sap to grow. Apologies if I missed it in the post.
Yes! You want trees to be about dinner plate size for one tap and bigger for more. At the places I’ve worked, we’ve never done more than three taps per tree.
I’m never going to look at syrup the same way. I have such romanticized notions from reading Little House books (like Stephanie above), but it all sounds like… so much work. But delicious work, nonetheless. And I’m sure that it will end up being some of your children’s favorite memories, even if they grumble at the time.
Over here at our teeny tiny 1/6 acre homestead, which I have jokingly named In The Buff Farms — due to our last name and not any actual outdoor nudity, I don’t want to give our sweet neighbor Shirley a heart attack — I am debating whether or not to go ahead and get some of my starts in the ground. It’s a balmy 54 degrees over here in my corner of the Pacific Northwest, but we have 7 days of rain in the forecast. I might wait another week to harden them off… that makes it sound like I know what I’m doing instead of just pure procrastination, right?
“In the Buff Farms”! I die!
SO are you going to sell it? I know people who have backyard honey factories and sell it at farmer’s markets, etc, but it sounds like you are going to have a bumper crop of syrup!! One of the things I did buy when I visited Vermont was some maple syrup from a farm stand.
Threenagers are for real, but just wait for 4… hopefully girls are better, but my 4 year old boy really knows how to test his limits (and my patience!!).
Editorial note: Typo in Step 8 first sentence–“until “we” the weather. Just thought you’d like to know. Wonderful writing and blog. I thoroughly enjoyed your book.
Wondering if you can leave the lines up for next year? Or will you have to set up the operation again from scratch?
I don’t think I’ll ever complain about the price of maple syrup again. Who knew there was so much to this process? Your stories about life on the homestead are fascinating, but this one might be a little too time intensive for this city slicker. Veggie gardens? Yes! Maple syrup? I’m going to have to stick with purchasing it. 😉
Yes! The entry I was waiting for. How fun. Thanks for writing it all up. It takes a lot of sap to make syrup, so I don’t blame you going with the big tank! The 40:1 ratio means that 275 gallons of sap boils down to less than seven gallons of syrup.
Loved hearing about your sugaring adventures. I am so homesick for my home state of Vermont (currently in Florida) and reading your description makes me nostalgic for the sweet smell of boiling sap. No other scent like it in the world!
Great post today. Fresh maple syrup – the best! It makes me so happy to open my email and see you have posted! Very interesting post. Good job, Mr. and Mrs. FW.
Lol, no kidding, it seems like A PROCESS! I know I don’t like maple syrup enough for that much work, but I hope it turns out lovely for you. Will there be lots of pancakes in your future?
Run to the library and get Miracles On Maple Hill by Virginia Sorensen! A wonderful book…. I keep trying to describe it, but really, you should just read this beautiful children’s story with a strong thread of Sugaring through it.
This was an exciting post, thank you for letting us live this with you, we’re excited for part 2!
Btw, we found snow an excellent place to let our toddlers have at it when needing to throw a tantrum for no real reason. =>
We got a sugar house with a wood fired evaporator when we bought our farm but have yet to collect enough sap to run it. We just boil the sap in an open pan over a propane burner. It works fine for our needs.
Is your tractor four wheel drive? Hiw dies it handle in the snow? We’re trying to figure out if we need that feature or if chains will work just as well.
Our experience with hubby’s 4wd diesel, new holland tractor with a bucket for moving snow has been that the diamond pattern chains on the rear tires with added weight, a barrel filled with water, is a must. The regular agricultural tires will spin on the incline versus gripping. With an 800 foot driveway that has a decent include, chains are a must more so than the 4wd feature. Even hauling wood, he doesn’t use 4wd feature. That is just our experience as we have a gravel driveway.
Our Amish neighbors use clear plastic sap bags.It’s a daily job with the right temps, every other day when not. One neighbor had 12,000 taps … yes you read that correctly. Asked Hubby if he could work for him next year during “sugar” season. LOL. We were told it takes 60 gals of sap (they call it maple water) to make 1 gal of syrup. HARD WORK AND TIME CONSUMING for sure.
Here is the story of how my mother and grandmother boiled down their syrup when we were children, as an example of how NOT to do it. Since Mrs. did a great job of explaining the process of collecting the stuff, I’ll start at that point.*** Since they didn’t have a maple house, so they could boil this stuff outside, Mom boiled it in the kitchen, over the gas stove. Even with all four burners going full time and using the biggest pots we owned, it still took a long time to boil it down sufficiently, and we got tortured for days with the smell of maple syrup we couldn’t yet eat.
It was when Mom and Gram were finally bottling the stuff that they figured out why people suggested they do it outdoors. It seemed that that much steam, for that long, in a relatively small kitchen, had a tendency to take the wallpaper right off the wall. Gram was making breakfast for us, and pink striped wallpaper suddenly clunked her on the head, and fell into the pancake dough.
I never remember them making maple syrup after that.
This was fascinating! Thank you for sharing. <3
Thank you – so interesting, and SO much work! Also, I truly believe your children WILL, in fact, have fond memories of syruping on the homestead with mom and dad and sister. It never does look quite how we expect it to look, but the kids won’t remember the childhood meltdowns and chaos, but instead sweet memories of love and family. And thankfully, there is not a perfect family or childhood in existence! Keep doing the hard work, Mama. And thank you for sharing your journey!
Wow,a very delicious (Maple syrup after all) and informative post.From where I come, we have always seen Maple syrup in bottles and never thought about the process but after reading your post ,I so want to experience the whole process. Definetly a lovely memory for kids and parents too.
Is it u and Mr FW only who manage all this or u do take others help.Its so much work for sure but I guess worth it 🙂 Cheers!!
It’s just me and Mr.FW, which is why it’s always so chaotic!!
My husband grew up with maple syrup from his grandfather’s operation, one gallon to every grandkid for Christmas! I grew up with margarine and ‘maple flavor’ syrup, he introduced me to The Real Stuff. Two treats I love are warm homemade bread with butter, and vanilla ice cream topped with maple syrup. Yum!!
I love sap season. When I was younger, we would collect and boil sap into maple syrup and it was a lot of work but totally worth it. I love the system that you have set up.
On one hand, how exciting! Making your own maple syrup!! On the other hand, it sure seems like a LOT of work. Can’t wait to hear about all the new recipes using maple syrup.
Making maple syrup is one of my favorite memories as a kid in upstate New York… getting on snowshoes to go out with the bucket and my mom (with my brother in the backpack) and gather the sap from the cut off milk jugs hanging on our taps, getting to stay up late with my dad boiling the sap off in the open wood fired boiler out in the woods… of course what my mom remembers is what a pain it was and how everything got sticky (and the multiple times my brother flipped out of the backpack when she bent over – got to love the 80s child safety equipment), but I remember that as one of the happiest things about winter as a little kid.